Author: Nathan Virgil

Hardwood Floor Refinishing

If your hardwood floors are scuffed, scratched, or show signs of water damage, it’s time to consider refinishing. Hardwood Floor Refinishing Bergen County NJ will bring back the shine and repair any deep gashes or dings.

Hardwood Floor

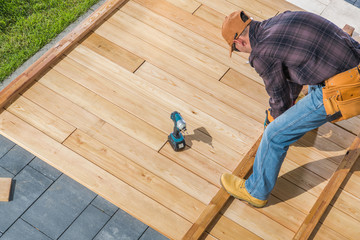
Refinishing is a time-intensive process. It requires clear rooms and the removal of furniture, so plan ahead! A professional will be able to advise you on the best solution for your home.

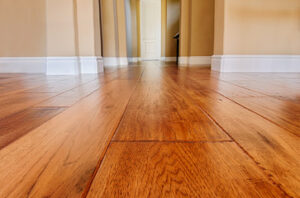
If your floors are starting to look dull or scratched, you may want to consider refinishing them. The process involves sanding down the wood and then applying a new coat of stain or varnish. This can revitalize the appearance of your hardwood floor and help it withstand the rigors of daily life.

Before beginning the refinishing process, it is a good idea to do some research on your flooring. There are many different types of wood, and refinishing requires a specific type of finish for each. Using the wrong product could damage your floors and cause problems in the future. You should also be sure that you have the right equipment for the job. You will need a floor drum sander and a floor edge sander, as well as a vacuum cleaner with a dust collection bag. It is also important to have the right supplies, including a high-quality stain and varnish with low levels of VOCs (volatile organic compounds).

You should also clean your hardwood floors thoroughly before starting the refinishing process. This is not only a good idea from an environmental standpoint, but it will also ensure that no dirt or dust is left behind on the finished product. Family Handyman suggests sweeping and vacuuming the area, as well as wiping down surfaces with a microfiber cloth or tack towel dampened with mineral spirits. This will remove any residue left behind from sanding and allow the final coat of stain or varnish to adhere properly.

Once you have cleared the space, you should move any furniture from the room that is to be refinished. This includes any area rugs that are in the space. It is also a good idea to relocate any appliances, such as the washer, dryer, and refrigerator, as well as extinguish the pilot lights on any gas heaters. This will protect these items from potential damage from sanding dust and will prevent any accidental spills on the surface of the floor while the refinishing process is taking place.

Before refinishing your hardwood floors, you should determine whether they are made from solid or engineered wood. Engineered wood typically has a thinner veneer and will not stand up to refinishing as well as solid hardwood. If you are not sure, try looking for the brand name and model number on your engineered wood flooring or a receipt from when it was installed. You can also consult a flooring expert to determine the type of wood in your home.

Staining

Staining is a major decision because it affects the overall look of your hardwood floors. The color will be a permanent fixture, so it’s very important that you choose wisely. If you’re not happy with the end result, it can be very difficult to correct it. If you apply a stain and then decide that you don’t like the look, you will have to sand the entire floor again and start over. That can be very costly and time-consuming.

It’s a good idea to do a test stain in an inconspicuous area before you begin. This is the only way to be certain that you will get the exact color that you want. It’s also a great opportunity to make sure that the stain will cover any scratches or chips that might be present in the wood. This step is especially important if you’re using a rental sander because these machines can leave cross-grain scratches that will be much more noticeable once the floor is stained.

Once the stain is dry, it’s time to protect your investment with a polyurethane sealer. This is a fairly simple process, but it’s very important that you take your time. You should use a high-density foam roller and, if needed, a small brush to get into hard-to-reach corners and other areas of the room. Be sure to follow the manufacturer’s instructions when applying the sealer.

This is the only way to guarantee that you will have a durable, long-lasting finish on your hardwood floors. If you skip this step, the finish will quickly wear down, making your floors look dull and dirty.

Staining your hardwood floors can be a challenge, but it’s one that is well worth the effort. Just be sure to plan ahead and take your time, and you will have beautiful hardwood floors for years to come. If you’re unsure about how to sand and stain your own floors, contact a professional flooring contractor for help. They will be able to guide you through the process and give your home the fresh, new look it deserves.

Sealing

After the stain has had a chance to set, it’s time for the wood floor sealer. Like the stain, this can be either oil-based or water-based, and it should be a high-quality professional product that is specifically designed for hardwood floors. A sealer helps to even out the surface of the wood, prevent tannin bleed and side bonding, increase durability, and protect the new finish against water damage.

When applying the sealant, you’ll want to follow the grain of the wood again and use a roller for an even application. You’ll also need to be careful not to get any of the sealant on other surfaces, and you should open any windows necessary to avoid unwanted fumes during this process. After the first coat of sealant has dried, you’ll need to lightly sand again with a fine grade of sandpaper, such as #220. It’s important to wear a respirator during this step as well, as the sealant and sanding dust can be harmful to your health.

Once the second coat of sealant has been applied and dried, it’s a good idea to do a smell test again. If the odor of the varnish or sealant is too strong, you may need to choose another product that has lower odor levels.

Prior to the development of polyurethane finishes, wax was the hardwood floor finish of choice in many homes and is still popular with do-it-yourselfers. Wax is available in both liquid and paste forms, and it can be colored with wood stain to add a little extra color or character. Wax can be buffed with a buffing machine or with a cloth, and it will need several coats to achieve a smooth, shiny finish.

Once polyurethane was developed, it quickly became the hardwood floor finish of choice due to its durability and ease of maintenance. Water-based polyurethane can be used in the same way as oil-based polyurethane, but it dries much faster and gives off fewer harmful fumes during application. Before choosing a water-based polyurethane, be sure to read the manufacturer’s instructions and safety data sheets carefully.

Cleaning

After refinishing hardwood floors, it is important to take the proper steps to keep them looking good. This will prevent the need for a full sanding and refinish in a few years. Regular cleaning and a coat of polish will help preserve the look of the wood. Homeowners can use a hardwood floor cleaner that is low-VOC to clean the floors on a daily basis.

Regular scrubbing and damp mopping will remove the dirt that builds up on the surface of hardwood floors. Vacuuming is also a necessary step. Many homeowners use a robot vacuum or a standard vacuum cleaner to get the job done. This will ensure that all of the dust and debris are removed.

It is a good idea to remove shoes indoors to avoid tracking in dirt, grime, and mud. Area rugs can be placed in areas of high traffic or frequently used rooms to minimize the amount of wear on the floor. Avoid using cleats or boots on the floor because they can cause scratches. It is also a good idea to put pads under furniture that sits on the hardwood flooring, which will minimize stains from water spills.

When choosing a contractor to work on hardwood floor refinishing, it is essential for homeowners to read reviews and get multiple estimates before making a decision. A reputable company will have a proven track record of satisfied customers and will be able to answer questions that homeowners may have. It is also a good idea for homeowners to find out whether the contractor will charge extra for moving furniture out of the room, which can be a large part of the overall cost.

The amount of time between refinishing the floors will depend on several factors, including the lifestyle of the homeowner and the frequency of traffic on the floors. Most experts recommend that a floor be refinished every five to 10 years to maintain the beauty of the hardwood floors.

While a traditional sand and refinish can be an expensive project, homeowners can reduce the number of times they need to hire a professional for this job by keeping their floors in great condition. This can be accomplished by keeping up with routine maintenance, avoiding the use of furniture sprays (which contain oils and waxes) that will degrade the polyurethane on the floors, and cleaning regularly using a low-VOC hardwood floor cleaner.

How to Find Reputable Deck Builders

Building a deck is an expensive undertaking. To make sure the contractor you hire is reputable, ask for printed estimates and contracts before the project begins. Read on Pro Deck Builders Charleston to learn more.

Deck Builders

It’s important to find a contractor with plenty of experience. This will ensure they have the skills to build a deck in your backyard. It will also help you to avoid mistakes that could cost you money and time in the long run. Ask your friends and family for references, or do some online research to find a list of contractors in your area. Then, look at their website to see what kinds of projects they have completed.

Once you’ve narrowed down your choices, you should compare their designs to be sure they meet your needs and expectations. Make sure to address any concerns about a design before moving forward, as making changes later can add costs and complicate your project.

The design process is a crucial part of any deck-building project. A good contractor will listen to your wishes and use their experience to create a design that fits your property and lifestyle. They’ll also be familiar with any township or city rules that may affect the size and orientation of your new deck.

Another factor to consider is how experienced the contractor’s staff is. If you hire a top-tier builder, they will have highly skilled, knowledgeable employees who can handle any problem during construction. On the other hand, bottom-tier builders may hire unskilled employees who are not familiar with building a deck.

The best way to determine if the contractors you’re considering are right for your project is to schedule a face-to-face meeting at your home. This will help you determine if the contractor’s vision matches your own, and it’s a great way to get a feel for their professionalism. A good deck builder will also be able to answer any questions you might have about their process and the timeline for your project.

License

This is one of those pieces of advice that gets shared over and over again: always hire a licensed, insured contractor. It’s a good idea for any remodeling project, but especially when you’re dealing with something as large and complex as a deck. It’s important to protect your investment, and hiring an unlicensed contractor is a big mistake that often leads to disaster.

In addition to the liability issues, an unlicensed handyman isn’t qualified to do professional work. He may not follow industry standards or install the deck according to manufacturer specifications, which can lead to costly problems down the road. He may also be unable to meet warranty requirements for the materials used, which can nullify your product’s warranties.

Most regions require permits for homeowners who put up new decks, or even replace old ones. Homeowners who build their own deck without a permit are likely to be fined or asked to tear down the unpermitted structure. Cities can often find out that a homeowner has built a deck without a permit through satellite photography and other means, such as when the city does its annual property tax assessments.

A contractor who is licensed to build decks should be able to handle the permit process for you, or at least tell you who can. They should be familiar with local building codes and zoning restrictions, such as how far the deck can be from the house or any easements or rights of way. They should be able to provide a plot plan showing the location of the proposed deck on your property, including front, side and rear setbacks, as well as any floodplain or historic district designations.

It’s also a good idea to check with the builder’s references. Ask for a list of three or more satisfied customers who can speak to the quality of their work. Also, ask if they belong to any local or national builder’s organizations. Membership in these groups can be a sign that the contractor has the commitment and reputation to stay in business. It can also give you a feel for their style and approach to the work.

Insurance

When you’re looking for a deck builder, be sure to ask about their insurance. This is one of the most important things you can do to protect yourself from liability. Deck builders must have general liability insurance, which will protect them if they are sued by clients or third parties for property damage or bodily injury. It is also possible for a deck builder to get injured on the job, so it’s important to have workers’ compensation coverage.

Deck contractors should have a business owner’s policy, or BOP, which will include general liability insurance and other coverages that a small business needs. This type of coverage can help pay for legal fees and settlements that might be necessary if a claim is filed against the company. It can also cover the cost of any repairs that are required if a piece of equipment is damaged.

It’s also essential that deck builders have commercial auto coverage. This will cover any damages that their trucks or vans sustain in an accident, and it can also protect them if they are sued for false advertising or libel. A good deck builder will also have workers’ comp coverage for their employees. If an employee is injured on the job, this insurance will cover their medical expenses and lost wages.

Another thing to consider when hiring a deck builder is their work ethic. You want to make sure that they are dependable and will follow through on their promises. They should also be willing to answer any questions that you may have about the project. They should be able to provide you with a timeline of when the deck will be completed, and they should be able to tell you what materials they will use.

Finally, you should also find out what their cancellation and refund policies are. Sometimes, unexpected delays can occur during the construction process, and you may need to cancel your project. A reputable contractor should be flexible and will offer you a refund or a discount on your project. They should also be transparent about their billing practices and will give you an itemized list of all charges.

Reviews

Many deck builders are licensed and insured, but it’s important to find one that has experience and a good reputation. Check reviews online and ask for references from past clients. You should also be able to see examples of their work before hiring them. In addition, they should be willing to provide a detailed proposal within a few days.

The deck was built in a few days and looks beautiful. The crew was friendly and efficient. I was very pleased with their attention to detail. The price was reasonable. I will definitely use them again.

In terms of gameplay, Power Rangers: The Deck-Building Game follows many of the genre conventions that have been established by Dominion and Ascension. The basic structure of the game has a central loop of playing cards, purchasing resources, and using those resources in turn. However, the game struggles with an unnecessarily complex progression of play that doesn’t make it easy to achieve the objectives of the game.

Another issue is that the game doesn’t do a very good job of balancing its resources. There are times when a player will build their deck with the intent of improving it, but will find themselves short on the resources needed to purchase the improved card they desire. This can be a frustrating experience that slows down the pace of the game.

Overall, Power Rangers: The Deck-Building game is a fun celebration of the franchise and a shorter, punchier take on the deck-building genre. The quality of the game pieces and artwork continues Renegade Game Studio’s high standards, and the rules are straightforward enough for those not familiar with deck-building games to grasp quickly. While there are some strange character card imbalances, this is still a very enjoyable deck-building game and a must-have for fans of the franchise.

Interior Designers – Where to Find Inspiration and Ideas

There can be little more satisfying than bringing your creative vision to life & delighting your clients in the process.

Interior Designers

Interior Designers Park City work with architects to plan and create interior spaces for residential and commercial properties. They select furniture, lighting, and floor coverings to make a space appealing.

In addition, they also help clients consider how their interior design will impact their home’s value.

There are many resources available to interior designers, including a variety of professional associations, books, and journals. In addition, there are also several online design communities where you can find inspiration and ideas.

Getting started in the field of interior design requires learning the basic principles and techniques used to create aesthetically pleasing spaces. One of the best ways to start is to browse through the work of professional designers and see how they use color, line, and texture to create functional and beautiful designs.

Another way to learn the basics of interior design is to attend a class or take a workshop. Some of these classes are offered by professional organizations, while others are held by online interior design websites.

If you’re looking for inspiration, consider checking out the following websites and blogs:

This website features a huge selection of photos and products to help you transform your home into your dream space. It also features home tours, DIY projects, shopping guides, and more.

A user-friendly website, this resource is a great place to get design ideas and inspiration. It features gorgeous photos and a wide range of styles, from classic to contemporary.

Erin Williamson shares her experiences and tips for interior design on this blog. The website is a great place to get the design inspiration, and it features a forum for asking questions of other design professionals.

Designer at Home: This service provides home interior design services to homeowners on a budget. It features an easy-to-use interface and allows you to work with a professional designer from the comfort of your own home.

CAD Software: Most interior designers use computer-aided design (CAD) software to create drawings, which can include schematics and plans. They may also use building information modeling (BIM) software to create three-dimensional visualizations of construction elements.

A voluntary certification is a common option for interior designers. It allows you to demonstrate your expertise in a particular area of the design industry and helps you stand out among your competition.

The Bureau of Labor Statistics predicts an increase in demand for interior designers through 2028. It also expects a move toward environmentally friendly and sustainable design solutions. In the meantime, it’s important to stay up-to-date with the latest trends in the field.

Transparency is a key design principle in modern architecture and interiors. It is an essential element of a space’s identity and one that can be achieved through modern window wall technology, which allows for large glass panels to be used within a building’s architecture.

A building’s transparency is an important component of the overall design process and should be considered early on in the project’s development. It can also be a valuable tool for achieving environmental goals and increasing sustainability throughout a building.

In terms of a building’s energy consumption, transparent design can be particularly beneficial as it reduces the use of electricity and helps cut business costs. Lighting accounts for nearly half of a building’s electricity consumption and greater use of natural light can cut this by 25%.

Another way that transparency is achieved in architecture is through the use of materials. A popular method is to use a glass facade component, which can be either translucent or opaque and is designed to provide visual interaction between the spaces in front of and behind the material.

Many architects are now pursuing transparent materials and are even working with manufacturers to improve the environmental impact of their products by using a more environmentally-friendly production process, such as recycled content or renewable energy. 

Similarly, transparent materials are increasingly incorporated into the design of offices. By allowing workers to see each other and their surrounding environment, transparent designs help foster collaboration as face-to-face communication is more likely to spark innovative ideas than an email chain or inter-office phone call.

How to Handle Roof Leak Repair

roof leak repair

If you have noticed a leak on your roof, you need to know how to handle the situation. You need to determine the cause of the leak and then find out how to repair it. The next step is to find the right roofing service to help you out.

Step flashing

Step flashing is an important part of your roof. It keeps water from entering your home. Step flashing is a reliable solution to keep your roof leak-free when installed correctly.

There are many types of step flashing to choose from. The most common are galvanized steel or aluminum. However, you can also purchase a painted version that provides extra protection. A good roofing contractor can install step flashing to your specifications.

Step flashing can be purchased as a box of 100 or as single pieces. Most dealers sell it in pre-bent configurations. If you are installing it yourself, you will need to follow a few steps to get it installed correctly.

First, you will need to cut the piece of step flashing to the proper length. Make sure the piece is a full 2 inches longer than the shingle you will be installing. Next, make a small bend along the edge of the metal strip.

Caulk

There are many types of roof sealants available on the market. Some are spray coatings, and some are caulk. Selecting the right one depends on your particular application.

If you are dealing with a small leak, spray cans may be your best bet. They are easier to apply and require less work. You can also use a paint can to apply a thick layer of sealant to a larger area.

If you have a large repair, consider using a liquid polymer sealant. It’s easy to spread, and provides a watertight seal when dry. This type of sealant is ideal for gutters, pond equipment, and other types of water-based systems.

You can also use a caulk gun to apply the sealant to your roofing materials. Caulk gun sealants are less messy than traditional sealants.

Roof cement

Roof cement is a great way to fill small holes and blisters on your roof. However, it’s not the only solution to roof leaks. If you have a large hole or crack in your roof, you should contact a professional for more permanent repairs.

Choosing the right type of roofing cement for your needs is important. Some products are made specifically for wet or dry surfaces, while others are ideal for both. You may even want to use a rubberized version of the product if the weather is cold.

A quality product will be manufactured using industry best practices. For example, you might want to choose a roof cement that contains 3% to 10% synthetic rubber. This will help keep the material from sliding off your roof before it hardens.

Identifying the source of the leak

If your roof is leaking, identifying the source is crucial. A leak can lead to mold growth and damage to your home’s interior. There are several ways to find a leak.

First, start by looking inside your home. Try to look for dark spots on wood or stains on the ceiling. You may also see condensation. These are signs of moisture, which indicates a leak.

You should also inspect the attic, where a water leak can go undetected. Turn off all light fixtures, and inspect the area for any signs of moisture.

If you have access to the attic, use a flashlight to locate any water stains. Then, try to work your way up from the bottom of the stain. When you come to a spot with a leak, call out.

Minimizing the leak while waiting for repair services

While waiting for roof leak repair services, you should take steps to minimize the damage. These steps can protect your property from further damage and minimize the cost of the repair.

Identifying the leak is the first step. You may be able to see the source of the leak from the exterior, but you will probably have to do some work inside to find the problem.

The best way to locate the source of a leak is to remove the shingles. This will reveal the location of the leak and help you to contain it.

You should also remove any drywall or tiles that are affected by the leak. You should then use brightly colored tape to mark the location of the leak. If you have access to a bucket or trash can, you can collect the leaking water and funnel it to a designated spot.

How to Choose the Best Roofing for Your Building

Roofing is the top cover of a building. It includes all materials, constructions, and structures used to cover it. The purpose of the roof is to provide protection from the weather. It is an essential part of the building’s envelope. In this article, you’ll learn how to choose the best roof for your building. We’ll also discuss the most common materials used for Roofing. Once you’ve selected your roof materials, you’re ready to get started on the roofing project.roofing

Roofing materials come in different colors and textures, and shingles are no exception. To get a proper color match, you’ll need to measure your roof and choose the best shingles. Using a utility knife with hook blades is a good idea. Also, remember that shingles must be staggered. Standard reveals are 5 to 6-1/2 inches. During the laying process, be sure to measure horizontally and vertically.

The most common type of underlayment is asphalt-saturated felt, which was used for decades before other types became popular. Asphalt is made from residue from refined crude oil and offers additional protection from water, fire, and weather. However, asphalt tends to tear easily and is not good for performance in extreme heat and UV rays. This is why a number of manufacturers have a choice between asphalt and plastic. Roofing materials are important for your home’s overall protection, and they can vary from one type to another.

Aside from aging, your roof may also be in good shape, but it may not be structurally sound. If it’s still intact, you can consider reroofing instead of replacing it. A reroofing job is more affordable if the deck is already in good condition. Quality shingles can last ten years or longer. If you’re interested in a quality roof, you’ll want to choose a high-quality shingle.

Another popular choice for roofing is slate. Slate roofing is inexpensive and long-lasting. Slate can last between 50 and 200 years, depending on the material used. It is fireproof, withstands extreme temperatures, and is highly resistant to small branches. Slate is available in natural quarried and synthetic versions. Both are durable and attractive, but they can be pricey. The price of the slate varies based on the quality and size of the slate and the amount of it used.

In general, roof slope is proportional to the amount of rainfall. Houses in low-rainfall areas have low-pitched roofs, while those in areas with high rainfall typically have steeper roofs. Longhouses with steep-pitched roofs sweeping almost to the ground. A high-pitched roof is common, but the slope is usually less than a half-inch. Nevertheless, there are exceptions to this rule, especially when it comes to roofing.

Roofs have many uses. They serve as the topmost layer of a building and provide protection from the weather. They can be flat, domed, vaulted, or can be a combination of these. These roofs serve many different functions, including safety, security, and privacy. In addition, they may also be aesthetically pleasing. For this reason, roofs are essential for buildings and structures. These roofs play a crucial role in the building’s envelope, a critical part of a building’s overall design.

Flat roofs, on the other hand, require big sheets of roofing material or cloths impregnated with asphalt. This way, there is less risk of leaks. Another common method is asphalt roll-roofing. This technique uses asphalt in 3-foot-wide rolls that are secured with granules. The membrane then adheres to the roof with mechanical fasteners, glue, or rock garden ballast. When installed, the rubber is secure and prevents leaks.

Roofing history. The first roofs are prehistoric. Stone lintels were used in ancient times to support roofs. These were not ideal for large buildings, however, and were only useful for short spans. Stone arch forms were commonly used in ancient times. They spanned spaces up to 45m in diameter and had ribs. These structures dominated the major architectural works for nearly 2,000 years. They were eventually replaced by iron beams during the Industrial Revolution. 

Other types of roofs include shakes and metal roofing. These two types of roofs are relatively expensive, but they both have advantages and disadvantages. Shakes and shingles are more expensive than other materials, but they create a more attractive look than a flat roof. Unlike shakes, these materials are easy to install and can last up to 80 years. However, a good metal roof can cost anywhere from $6 to $14 per square foot.